Getting a new broadband connection? Whether you’re moving house, switching providers, or upgrading your internet, the installation process can sometimes feel overwhelming.
This ultimate guide covers everything you need to know about UK broadband installation, including:
✔ Different types of broadband installations
✔ How long installation takes
✔ Engineer visits vs. self-installation
✔ Common issues & how to fix them
✔ What to do before & after installation
By the end, you’ll feel fully prepared for a smooth, hassle-free setup.
📌 Types of Broadband Installation in the UK
Not all broadband installations are the same. The process depends on your connection type and provider. Here’s what to expect:
1. Standard Broadband (ADSL) Installation
-
How it works: Uses your existing phone line.
-
Installation type: Usually self-install (no engineer needed).
-
What you get: A router in the post with step-by-step instructions.
-
Time taken: 5-30 minutes (plug & play).
✅ Pros: Quick, no appointment needed.
❌ Cons: Slower speeds (up to 24Mbps).
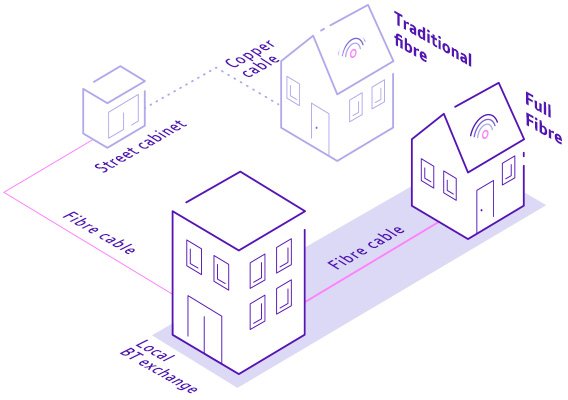
2. Fibre Broadband (FTTC) Installation
-
How it works: Fibre optic cables run to a street cabinet, then copper wires to your home.
-
Installation type:
-
Self-install (if your home already has a fibre connection).
-
Engineer visit (if new wiring is needed).
-
-
What happens during an engineer visit?
-
They install a new master socket (Openreach modem).
-
Test the line for optimal speed.
-
-
Time taken: 30 mins – 2 hours.
✅ Pros: Faster than ADSL (up to 80Mbps).
❌ Cons: Engineer visit may be required.
3. Full Fibre (FTTP) Installation
-
How it works: Fibre optic cables run directly to your home (no copper wires).
-
Installation type: Always requires an engineer.
-
What happens during installation?
-
A fibre cable is fed to your property (may involve drilling).
-
An ONT (Optical Network Terminal) is installed inside.
-
The engineer sets up your router.
-
-
Time taken: 2-4 hours (sometimes longer for complex setups).
✅ Pros: Blazing-fast speeds (up to 1Gbps).
❌ Cons: Longer installation, possible disruption.
4. Virgin Media (Cable) Installation
-
How it works: Uses a separate coaxial cable network (not Openreach).
-
Installation type: Engineer visit required (unless you’re reconnecting).
-
What happens?
-
The engineer installs a Virgin Media hub.
-
May need to fit a new wall socket.
-
-
Time taken: 1-2 hours.
✅ Pros: Superfast speeds (up to 1.1Gbps).
❌ Cons: Limited availability (not all areas).
⏳ How Long Does Broadband Installation Take?
| Type | Self-Install Time | Engineer Visit Time | Activation Time |
|---|---|---|---|
| ADSL | 5-30 mins | N/A | 24-48 hours |
| Fibre (FTTC) | 30 mins | 1-2 hours | 24-48 hours |
| Full Fibre (FTTP) | N/A | 2-4 hours | Same day |
| Virgin Media | N/A | 1-2 hours | Same day |
⚠️ Note: Even if your router is set up, your broadband may not work immediately. Activation can take up to 24-48 hours (except FTTP & Virgin).
🔧 Engineer Visit vs. Self-Installation: What to Expect
🔹 Self-Installation (No Engineer)
✔ You’ll receive: A router, cables, and instructions.
✔ Steps to follow:
-
Plug the router into the master phone socket.
-
Connect via Ethernet/WiFi.
-
Follow the provider’s activation steps.
✅ Best for: Simple upgrades or existing connections.
🔹 Engineer-Assisted Installation
✔ What to expect:
-
The engineer will check your line and install any necessary equipment.
-
They may need to drill holes for cables (FTTP/Virgin).
-
They’ll test the connection before leaving.
✔ How to prepare:
-
Clear access to the master socket & router location.
-
Be home during the appointment window.
-
Ask questions if unsure!
✅ Best for: New connections, full fibre, or complex setups.
⚠️ Common Installation Problems & Fixes
1. “My broadband isn’t working after setup!”
🔹 Fix:
-
Wait 24-48 hours for activation.
-
Restart the router.
-
Check all cables are secure.
2. “The engineer didn’t show up!”
🔹 Fix:
-
Call your provider to reschedule.
-
Check for text/email updates.
3. “My WiFi signal is weak!”
🔹 Fix:
-
Move the router away from obstructions.
-
Use a WiFi extender if needed.
4. “The speed is slower than promised!”
🔹 Fix:
-
Test via Ethernet (not WiFi).
-
Check for network congestion (evening slowdowns).
📅 Before & After Installation: Checklist
✅ Before Installation
✔ Check your provider’s coverage (use Ofcom’s checker).
✔ Book time off work if an engineer is coming.
✔ Clear space near the master socket.
✔ Back up old settings (if switching providers).
✅ After Installation
✔ Test your speed (using Speedtest.net).
✔ Secure your WiFi (change default password).
✔ Optimise router placement (central location, elevated).
✔ Contact support if speeds are much lower than advertised.
🏆 Which Providers Offer the Smoothest Installation?
| Provider | Self-Install? | Engineer Speed | Customer Satisfaction |
|---|---|---|---|
| BT | ✅ (FTTC) | ⭐⭐⭐⭐ (Fast) | 4/5 |
| Sky | ✅ (FTTC) | ⭐⭐⭐ (Average) | 4/5 |
| Virgin Media | ❌ (Engineer needed) | ⭐⭐⭐⭐⭐ (Quick) | 4.2/5 |
| TalkTalk | ✅ (FTTC) | ⭐⭐ (Slow at peak times) | 3.5/5 |
| Vodafone | ✅ (FTTC) | ⭐⭐⭐ (Reliable) | 4/5 |
Best for hassle-free installs: Virgin Media & BT
🔮 Future of Broadband Installation in the UK
-
More full fibre rollouts (Openreach & CityFibre expanding).
-
5G home broadband (no installation needed).
-
Self-install FTTP kits (coming soon).
🎯 Final Tips for a Stress-Free Installation
-
Choose the right package (check speed requirements).
-
Ask about self-install options to save time.
-
Be present during engineer visits.
-
Test everything before the engineer leaves.